


Showing posts with label how-to. Show all posts
Showing posts with label how-to. Show all posts


How-To: secure and hide the yarn ends
Wednesday, March 14, 2018
How to secure the yarn and make the start and end invisible. Use this when you embroider eyes, mouth and other decorations on a doll.
Try to choose a less visible point for the entry and exit of the embroidery yarn. I chose behind the ear. Insert the needle in the space between the stitches (do not go through the stitch and leave 2-3 inches yarn for securing when finished), pull the needle out at the front of the head and embroider the mouth or eye as instructed in the pattern.
After finishing pull the needle out at the same point (picture 1) then tie both yarn ends together (picture 2), use the tip of scissors to push both yarn ends inside the doll (picture 3) and you are finished (picture 4).

2
Try to choose a less visible point for the entry and exit of the embroidery yarn. I chose behind the ear. Insert the needle in the space between the stitches (do not go through the stitch and leave 2-3 inches yarn for securing when finished), pull the needle out at the front of the head and embroider the mouth or eye as instructed in the pattern.
After finishing pull the needle out at the same point (picture 1) then tie both yarn ends together (picture 2), use the tip of scissors to push both yarn ends inside the doll (picture 3) and you are finished (picture 4).

How-to Amigurumi 3D wall decoration
Sunday, September 17, 2017
You will need:
- Stretched framed canvas
- PVA glue
- A piece of crochet, fabric or felt for covering the stretched framed canvas.
- Tapestry needle
- Yarn for attaching dolls to the canvas
- Dolls


Round 20 of feet for the Huggy Dolls
Friday, September 5, 2014
Some crocheters ask about round 20 of the feet for my Huggy Dolls patterns (like the devils above). They have difficulty getting it right. One reason might be that row 14-19 is worked in rows and at round 20 you switch back to working in rounds.
How to read a crochet pattern
Thursday, July 3, 2014
Sometimes I receive an e-mail about how to read a crochet pattern. Below are some examples.
Number of stitches
Rnd 4: (Sc in next 2 sts, 2 sc in next st) around. (24)
Number (24) at the end of round = number of stitches after finished round.
Around
Rnd 5: (Sc in next 3 sts, 2 sc in next st) around. (30)
Repeat (Sc in next 3 sts, 2 sc in next st) until end of round
=> Rnd 5: (Sc in next 3 sts, 2 sc in next st), (Sc in next 3 sts, 2 sc in next st), (Sc in next 3 sts, 2 sc in next st), (Sc in next 3 sts, 2 sc in next st), (Sc in next 3 sts, 2 sc in next st), (Sc in next 3 sts, 2 sc in next st)
Total stitches of Rnd 5 = 5+5+5+5+5+5 = 30 sts
Repeat
Rnd 6: Sc in next 2 sts, 2 sc in next st, (sc in next 4 sts, 2 sc in next st) 5 times, sc in next 2 sts. (36)
Repeat (sc in next 4 sts, 2 sc in next st) 5 times
=> Rnd 6: Sc in next 2 sts, 2 sc in next st, (sc in next 4 sts, 2 sc in next st), (sc in next 4 sts, 2 sc in next st), (sc in next 4 sts, 2 sc in next st), (sc in next 4 sts, 2 sc in next st), (sc in next 4 sts, 2 sc in next st), sc in next 2 sts.
Total stitches of Rnd 6 = 2+2+6+6+6+6+6+2 = 36 sts


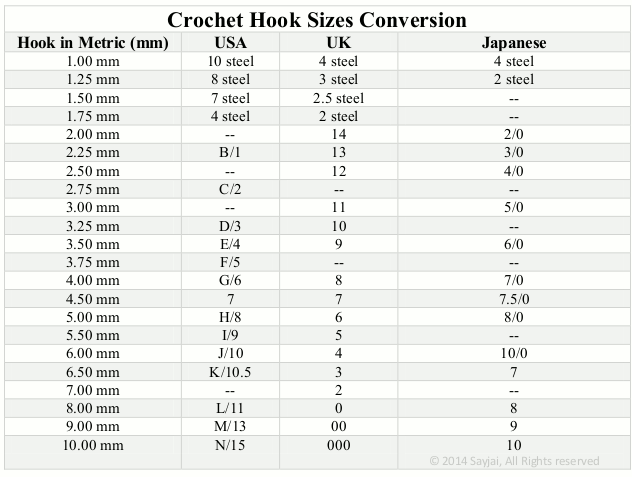
Yarn Weight System & Crochet Hook Sizes Conversion
Saturday, April 26, 2014In different part of the world we call the yarn
(weight / thickness) and the sizes of crochet hooks by different names. I have
created a conversion chart for yarn weights and crochet hook sizes.



How to attach a Doll to a Bag or Keyring
Friday, July 27, 2012
For small dolls:
1) Use yarn to make a loop on middle top of the head.


Attached jump ring on middle top of the head.


Attached mobile strap, key ring or chain.

Bigger Dolls
Use yarn to make a long chain. Pull it through the middle top of head.
Ch 4, (dc in the 4th ch from hook) 11 times, sl st in first st, ch 100 (or as long as you like), do not fasten off.

Put crochet hook through the middle top of the head, pull chain & yarn through, see pictures below.


Continue crocheting, (dc in the 4th ch from hook) 11 times, join with sl st in first st and go through the chain too, see pictures below.


You can also just make a chain. Pull it through the top of the head. Put beads at both ends of the chain or just make a knot.
Tutorial to make Hair for an Amigurumi Doll - Part II
Sunday, October 9, 2011
In this tutorial you can learn how to make the hair for a doll like in the photo below.

First you measure how long you want the hair to be. For this doll the hair is 12” (31 cm) long; from the end on the left side to the end on the right side (see picture 1). Wind the yarn loosely and evenly around a 6” piece of card board until the card is filled (see picture 2), then cut across one edge (see picture 3), repeat as needed.


Hold 18 strands of yarn in the front together (right & left side) but make sure they lie neatly next to one another, sew on 2 sides of the face as in pictures below.


Related tutorial: How to make beautiful hair. Part 1.
8


Draw a line on your doll’s head, starting from her forehead all the way over her head to middle back of head (or use pins, 1st pin on middle of forehead, 2nd pin on middle top of head, 3rd pin on middle back of head).

Hold 4 strands of yarn together, fold in half, sew on the line you’ve drawn earlier on your doll’s head using back stitch, starting from forehead to middle back of head. (see pictures below)


Take 6 strands from these 18 strands on both sides and tie them together on the back of head.

Take the rest and tie together on the back of head with colorful yarns.

How to connect legs together for an Amigurumi Doll
Monday, August 1, 2011
I usually crochet the legs for a doll first and then join the legs together. This diagram shows how I connect the legs.

After connected the legs, crochet up for the body and then the head.
Next time I will write about how I made Jazzy the Flower Girl's Hair.
1

After connected the legs, crochet up for the body and then the head.
Next time I will write about how I made Jazzy the Flower Girl's Hair.
How to choose crochet hook size and yarn for Amigurumi dolls?
Monday, May 30, 2011
3 to 8 inch Dolls: I usually use 4 ply/ DK yarn with 3-3.25 mm hooks.
Big dolls: I usually use 2 strands of DK yarn crochet them together with 4-5 mm hook or Chunky yarn with 5-6 mm hooks.
If you want to make a doll which is bigger than in the pattern, use a bigger hook and thicker yarn. Likewise for a smaller doll use a smaller hook and thinner yarn.
Below are the tables of the “Standard Yarn Weight System” and “Crochet Hook Conversion” which you can use as a guideline for the yarn and crochet hook.


1
Big dolls: I usually use 2 strands of DK yarn crochet them together with 4-5 mm hook or Chunky yarn with 5-6 mm hooks.
If you want to make a doll which is bigger than in the pattern, use a bigger hook and thicker yarn. Likewise for a smaller doll use a smaller hook and thinner yarn.
Below are the tables of the “Standard Yarn Weight System” and “Crochet Hook Conversion” which you can use as a guideline for the yarn and crochet hook.
Standard Yarn Weight System
Categories of yarn, gauge ranges, and hook sizes

Notes:
- GUIDELINES ONLY: The above reflect the most commonly used gauges and needle or hook sizes for specific yarn categories.
- Lace weight yarns are usually knitted or crocheted on larger needles and hooks to create lacy, openwork patterns. Accordingly, a gauge range is difficult to determine. Always follow the gauge stated in your pattern.
- Steel crochet hooks and UK/Canadian hooks are the higher the number, the smaller the hook.
Crochet Hook Conversion Chart

Next How-To: Beautiful Hair for your Doll


Subscribe to:
Posts (Atom)


