


- PDF pattern: Ravelry, Sayjai Amigurumi
- Kindle e-book crochet pattern (Mobi file)
- ePub edition for iPad, Nook, Sony E-Reader or Kobo E-Reader.
- German translation
- Swedish translation on Cissi's Swedish Amigurumi Blog (External link)

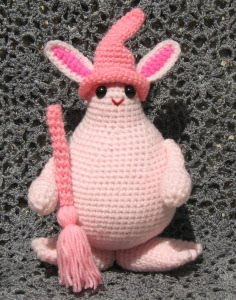
Pattern for the Pink Rabbit Monster Witch
For halloween I added a hat and broomstick.
This pattern can be made using any yarn you wish. Choose a hook size that matches the yarn
Materials:
I have used :
3.00 mm hook
4 ply yarn (Light pink, dark pink for inner ear, Red and green for hat)
Polyester fiber
Black 10 mm buttons for eyes or other eyes as desired
Tapestry needle
Sewing needle and thread for attaching eyes
Iron Wire 7 inches
Size: 6 inches tall
Abbreviations:
ch = chain
sc = single crochet
st = stitch
sl = slip
rnd = round
tog = together
hdc = half double crochet
dc = double crochet
Note: This project is working in continuous rounds, do not join or turn unless otherwise stated. Mark first stitch of each round.
Head and Body:
Starting at the bottom of the body.
Rnd 1: With light pink, ch 2, 6 sc in second chain from hook. (6 sc made)
Rnd 2: 2 sc in each st around. (12)
Rnd 3: (Sc in next st, 2 sc in next st) around. (18)
Rnd 4: (2 sc in next st, sc in next 2 sts) around. (24)
Rnd 5: Sc in next 2 sts, 2 sc in next st, (sc in next 3 sts,
2 sc in next st) 5 times, sc in next st. (30)
Rnd 6: (Sc in next 4 sts,2 sc in next st) around.(36)
Rnd 7: (2 sc in next st, sc in next 5 sts) around. (42)
Rnd 8: Sc in next 3 sts, 2 sc in next st, (sc in next 6 sts,
2 sc in next st) 5 times, sc in next 3 sts. (48)
Rnd 9: Sc in each st around.
Rnd 10: (Sc in next 7 sts, 2 sc in next st) around. (54)
Rnd 11: Sc in each st around.
Rnd 12: Sc in next 4 sts, 2 sc in next st, (sc in next 8 sts,
2 sc in next st) 5 times, sc in next 4 sts. (60)
Rnd 13-20: Sc in each st around.
Rnd 21: (Sc in next 8 sts, sc next 2sts tog) around. (54)
Rnd 22: Sc in each st around.
Rnd 23: (Sc in next 7 sts, sc next 2 sts tog) around. (48)
Rnd 24: Sc in each st around.
Rnd 25: (Sc in next 6 sts, sc next 2 sts tog) around. (42)
Rnd 26: Sc in each st around.
Rnd 27: (Sc in next 5 sts, sc next 2 sts tog) around. (36)
Rnd 28: Sc in each st around. Stuff.
Rnd 29: (Sc in next 4 sts, sc next 2 sts tog) around. (30)
Rnd 30: (Sc in next 3 sts, sc next 2 sts tog) around. (24)
Rnd 31-36: Sc in each st around.
Rnd 37: (Sc in next 2 sts, sc next 2 sts tog) around. Stuff. (18)
Rnd 38: (Sc in next st, sc next 2 sts tog) around. (12)
Rnd 39: (Sc next 2 sts tog) around, join with sl st in first st.
Fasten off.
Foot (make 2):
Rnd 1: With light pink, ch 2, 6 sc in second chain from hook. (6 sc made)
Rnd 2: 2 sc in each st around. (12)
Rnd 3: (Sc in next st, 2 sc in next st) around. (18)
Rnd 4-12: Sc in each st around. Stuff.
Rnd 13: For first toe, sc in next 3 sts, skip next 12 sts,
sc in next 3 sts. (6)
Rnd 14: Sc in each st around.
Rnd 15: (Sc next 2 sts tog) around, join with sl st in first st.
Fasten off.
Rnd 13: For second toe, join light pink to next free st on rnd 12, ch 1,
sc in same st, sc in each of next 2 sts, skip next 6 sts,
sc in last 3 sts. (6)
Rnd 14-15: Repeat rnds 14-15 of first toe.
Rnd 13: For third toe, join light pink to next free st on rnd 12, ch 1,
sc in same st, sc in next 5 sts. (6)
Rnd 14-15: Repeat rnds 14-15 of first toe.
Sew feet to bottom of body.
Ear (make 2 light pink, 2 dark pink):
Row 1: Ch 10, sc in second chain from hook, hdc in next 2 chs, dc in next 3 chs, hdc in next 2 chs, sc in next ch. Fasten off. (9)
Matching sts, hold 1 light pink ear and 1 dark pink ear tog, with dark pink side facing you. Join light pink with sl st at end of row 1, ch 1, sc in same st, sc in next 7 sts, (2 sc in next st) 2 times, sc in next 8 sts. Fasten off.
Sew ears to side of head on rnd 37.
Arm (make 2):
Rnd 1: With light pink, ch 2, 6 sc in second chain from hook. (6)
Rnd 2-8: Sc in each st around.
Rnd 9: 2 sc in each st around. (12)
Rnd 10-12: Sc in each st around. Stuff.
Rnd 13: Sc next 2 sts tog around. Fasten off. Sew opening closed. (6)
Sew arms to side of body over rnd 23-24.
Hat:
Rnd 1: With red, ch 2, 6 sc in second chain from hook. (6)
Rnd 2: Sc in each st around.
Rnd 3: (2 sc in next st, sc in next st) around. (9)
Rnd 4: (Sc in next 2 sts, 2 sc in next st) around. (12)
Rnd 5: (Sc in next 3 sts, 2 sc in next st) around. (15)
Rnd 6: Working in front loops only. Ch 1, reverse sc in each st around, join with sl st in first st. Fasten off.
***Reverse sc is working from left to right, insert hook in next st to the right and complete as sc.***


Pom-pom: Wrap green around cardboard 20 times, slide loops off cardboard; tie separate strand around middle of all loops. Cut loops, trim; sew to end of hat.
Sew hat on top of head.
Witch hat (pink):
Rnd 1: With pink, ch 2, 6 sc in second chain from hook. (6)
Rnd 2: Sc in each st around.
Rnd 3: (Sc in next st, 2 sc in next st) around. (9)
Rnd 4: Sc in each st around.
Rnd 5: (2 sc in next st, sc in next 2 sts) around. (12)
Rnd 6-7: Sc in each st around.
Rnd 8: (2 sc in next st, sc in next 3 sts) around.(15)
Rnd 9: Sc in each st around.
Rnd 10:(Sc in next 4 sts, 2 sc in next st) around. (18)
Rnd 11: Sc in each st around.
Rnd 12: (Sc in next 5 sts, 2 sc in next st) around.(21)
Rnd 13-14: Sc in each st around.
Rnd 15: (Sc in next 6 sts, 2 sc in next st) around. (24)
Rnd 16: (For ear hole,Ch 3, skip 3 sts; sc in next 9 sts) 2 times.
Rnd 17: (Sc in next 3 sts, 2 sc in next st) around.(30)
Rnd 18: (Sc in next 4 sts, 2 sc in next st) around. (36)
Rnd 19: (Sc in next 5 sts, 2 sc in next st) around, join with sl st in first st. Fasten off.(42)
Sew hat on top of head.
Broom: With pink.
Part 1: Broomstick
Rnd 1: Ch 2, 6 sc in second chain from hook.(6)
Rnd 2: Working in back loops only. Sc in each st around.
Rnd 3-13: Sc in each st around, join with sl st in first st. Fasten off
Part 2 : Bristles
Cut 20 pieces of yarn, 6 inches in length. Fold the yarn in half and loop an iron wire around the center, and then twist the wire up together.

Finishing:
Sew eyes 3 sts apart over rnds 35-36 of head. With red, embroider mouth.
Copyright
Copyright © 2009-2025 Sayjai Thawornsupacharoen. All rights reserved.
This pattern is for personal use only and may not be reproduced, published online, altered, or resold in any form.
You are permitted to sell finished items based on this pattern, provided they are handmade by you (the seller) and produced in a limited quantity. Please clearly credit the design to me, Sayjai of Sayjai Amigurumi, and include a link to my blog: www.amigurumi.one. Thank you for your respect and understanding.
www.amigurumi.one
www.facebook.com/amigurumi.one
www.sayjaiamigurumi.co.uk


Thank you very much for sharing the pattern! Love that cutsie, will be making one right after finishing current amigurumi project :)
ReplyDeleteToo darn cute!!!!
ReplyDeleteThank you for sharing the pattern for free! Its so wonderful to have adorable things like this shared freely...so that gifts can be made on tight budgets!!! :)
God Bless
very cute!!! thank you for sharing your Critter!!!!
ReplyDeleteTHANKS FOR SHARING. IT WAS A WONDERFUL THING YOU DID FOR US.
ReplyDeleteThank you and merry Christmas!!
ReplyDeleteMade correction in Head and Body:
ReplyDeleteRnd 8: Sc in next 3 sts, 2 sc in next st, (st in next 6 sts
changed "st" to "sc":
Rnd 8: Sc in next 3 sts, 2 sc in next st, (sc in next 6 sts
Thank you very much!
ReplyDeleteI've finished my Pink Rabbit Monster too..
http://crochetnknitting.blogspot.com/2012/02/crochet-pink-rabbit-monster.html